Preventative maintenance is a proactive strategy where you perform regular, scheduled upkeep on equipment to prevent unexpected failures. This approach minimizes costly downtime and extends the life of your valuable assets, ensuring your operations run smoothly and safely.
Unplanned downtime isn't just an inconvenience; it's a direct hit to your bottom line. Every minute a production line is stopped, every hour a critical system is offline, it costs you money, damages your reputation, and puts you a step behind the competition. At Revine Tech, our mission is to help "Make Indian Electronics Stand Out" on a global scale. We believe this starts with building robust, reliable, and incredibly efficient operations.
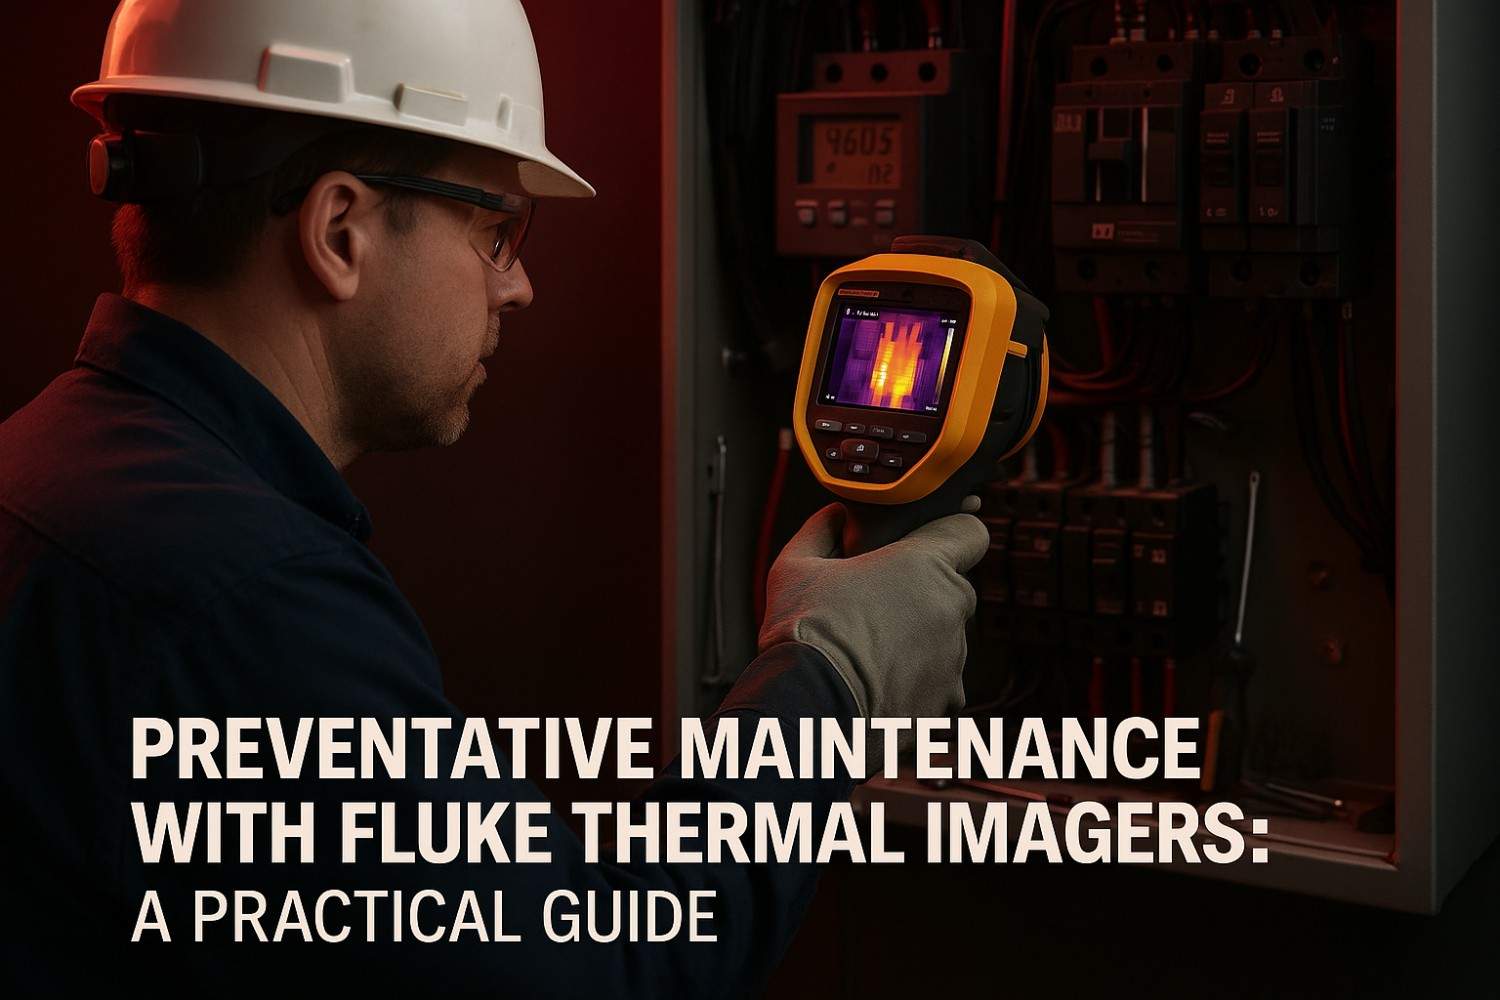
That’s where a smart maintenance strategy comes in. But what if you could see problems before they happen? What if you could spot a failing motor bearing or a dangerously overloaded circuit just by looking at it? With Fluke Thermal Imagers, you can. This guide is your practical introduction to the world of thermal imaging for preventative maintenance—a technology that can transform your facility from reactive to predictive, saving you time, money, and a lot of headaches.
What is Preventative Maintenance and Why Should You Care?
Let's be honest. For many businesses, maintenance is something that happens only when a machine breaks down. This is called reactive maintenance, and it's the most expensive and disruptive way to run your facility. It’s a cycle of emergency repairs, rushed orders for spare parts, and costly overtime for your technicians.
Preventative Maintenance (PM) flips this model on its head. It’s a proactive approach where you systematically inspect, service, and care for your equipment to prevent failures before they occur.
Reactive vs. Proactive: A Simple Cost Comparison
Imagine a critical motor on your assembly line.
- Reactive Approach: The motor’s bearing fails without warning. The entire line stops. You face hours, maybe days, of lost production. Your team scrambles to find a replacement motor, paying a premium for urgent delivery. The total cost? Potentially lakhs of rupees in lost revenue and repair expenses.
- Proactive Approach: During a routine thermal scan a month earlier, your technician noticed the bearing was running hotter than usual. They scheduled a simple, low-cost lubrication service during planned downtime. The motor never fails. Production continues without a hitch.
Most experts agree that a well-implemented preventative maintenance program can deliver huge savings. According to the Federal Energy Management Program (FEMP), a proper predictive maintenance strategy can result in savings of 30-40%. It’s a strategic shift from being a cost centre to a driver of profitability.
The Different Flavours of Maintenance: From Scheduled to Predictive
Preventative maintenance isn't a one-size-fits-all concept. It has evolved over time :
- Time-Based Maintenance: This is the simplest form. You service equipment on a fixed schedule, like changing the oil in a car every 10,000 km, regardless of its actual condition. It’s better than nothing, but can lead to unnecessary work.
- Usage-Based Maintenance: This is a step smarter. Maintenance is triggered by usage metrics, like hours of operation or production cycles.
- Condition-Based & Predictive Maintenance (PdM): This is the gold standard. You use monitoring tools to assess the actual condition of your equipment and perform maintenance only when data shows signs of a developing fault. This is where thermal imaging shines. It gives you the real-time data you need to predict failures and act just in time, maximising asset life and minimising costs.
Seeing the Invisible: How Thermal Imaging Transforms Maintenance
So, how can you "see" a problem developing inside a machine or an electrical panel without shutting it down? The answer is by looking at its heat signature.
The Simple Science of Seeing Heat
Every object with a temperature above absolute zero emits thermal energy, or heat. This energy is invisible to the human eye because it travels in the infrared part of the electromagnetic spectrum. A thermal imaging camera is a special device that can detect this infrared energy and convert it into a visible picture, called a thermogram.
In a thermogram, different colours represent different temperatures. Typically, brighter colours like red, orange, and yellow show hotter areas, while darker colours like blue and purple show cooler areas. This simple visual map of heat allows you to instantly spot anomalies. An overheating connection, a failing bearing, or a blocked pipe will all appear as a distinct hot (or sometimes cold) spot long before the problem becomes critical.
Why Your Scheduled Maintenance Might Be Wasting Money
This is a bold statement, but think about it. If you are replacing parts on a fixed schedule, you are likely throwing away components that are still perfectly healthy. This is the fundamental flaw of time-based maintenance. You’re spending money on parts and labour you don’t need to, and still not preventing every unexpected failure.
Thermal imaging allows you to move to a predictive maintenance model. Instead of relying on a calendar, you rely on data. You scan your critical equipment regularly to establish a baseline thermal image of it operating in a healthy state. Then, during future inspections, you look for changes. A gradual increase in temperature over time is a clear, data-backed sign that a component is deteriorating.
This data-driven approach means you focus your resources—your team’s time and your budget—only on the assets that actually need attention. You fix small problems before they become big, expensive failures, and you stop wasting money on unnecessary maintenance tasks.
The Fluke Advantage: Built for the Realities of Indian Industry
At Revine Tech, we are proud to be an authorized distributor of Fluke products because we know they are built for the job. When you’re in a demanding industrial environment, you need tools that are as tough and reliable as your team.
More Than Just a Camera: Rugged, Reliable, and Accurate
Fluke has over 65 years of industrial experience, and it shows in their design. Their thermal imagers are not delicate lab instruments; they are rugged tools built for the real world.
- Built to Last: Many Fluke cameras are engineered to withstand a 2-meter drop and have an IP54 rating, meaning they are protected against dust and water spray. This durability is essential for a long operational life and a lower total cost of ownership.
- Uncompromising Accuracy: Fluke uses 100% diamond-turned germanium lenses with special coatings. This might sound technical, but it means the camera captures the maximum amount of thermal energy, giving you a crisp, clear, and accurate image every time.
- Safety First: Thermal imaging allows you to inspect energized equipment from a safe distance, reducing the risk to your technicians. For inspecting live electrical cabinets, using IR windows is a game-changer, allowing scans without ever opening the panel door, eliminating the risk of a dangerous arc flash incident.
Signature Fluke Tech That Saves You Hours: LaserSharp™, IR-Fusion™, Fluke Connect™
What truly sets Fluke apart is the ecosystem of technologies designed to make your entire workflow faster and more efficient.
- LaserSharp™ Auto Focus: An out-of-focus image leads to inaccurate temperature readings. Fluke’s LaserSharp™ Auto Focus uses a built-in laser to calculate the exact distance to your target and focuses the camera instantly. No guesswork, just perfectly focused, accurate images every time.
- IR-Fusion™ Technology: A thermal image alone can sometimes lack context. IR-Fusion™ solves this by capturing a visible light photo and an infrared image at the same time. You can then blend them on-screen, overlaying the heat map onto the real-world image. This makes it incredibly easy to pinpoint the exact component—the specific breaker or bearing—that has a problem.
- Fluke Connect™ Ecosystem: This is the software that ties everything together. You can wirelessly transfer images from your camera to your phone or PC. With Asset Tagging, you can scan a QR code on a piece of equipment, and the image is automatically filed and sorted. This feature alone can save you hours of manual work back at the office, eliminating the headache of sorting through hundreds of images.
Choosing Your Weapon: A Guide to the Fluke Thermal Imager Arsenal
Fluke offers a range of thermal imagers to suit different needs and budgets. Choosing the right one depends on your specific applications.
From Pocket Powerhouses to Pro-Grade Tools
Fluke’s cameras are generally grouped into series:
- Performance Series (e.g., TiS20+, TiS55+): These are the workhorses for frontline technicians. They are perfect for routine inspections and quick troubleshooting, offering a great balance of performance, durability, and ease of use.
- Professional Series (e.g., Ti300+, Ti401 PRO): For experienced maintenance professionals, this series offers higher resolution and advanced diagnostic features like LaserSharp™ Auto Focus for more precise and detailed analysis.
- Expert Series (e.g., TiX580): These are top-of-the-line instruments for specialists who need the absolute best in image quality and analytical capabilities, featuring high resolution and large articulating screens.
Comparison Table: Which Fluke Imager is Right for Your Business in 2025?
To help you decide, here’s a quick comparison of some of the most popular models for industrial maintenance.
|
Model |
IR Resolution |
Key Features |
Best For |
|
PTi120 |
120 x 90 |
Pocket-sized, Fluke Connect™ Asset Tagging, Fixed Focus |
Quick scans and empowering an entire team with an affordable, easy-to-use tool. |
|
TiS20+ MAX |
120 x 90 |
5-hour battery, IR-Fusion™, 2-meter drop tested, Water/dust resistant (IP54) |
Frontline electrical, HVAC, and mechanical inspections. A rugged, reliable first camera. |
|
TiS75+ |
384 x 288 |
Manual Focus, Video Recording, Voice Annotation, Asset Tagging |
Detailed industrial inspections where higher resolution is needed for better analysis. |
|
Ti300+ |
320 x 240 |
LaserSharp™ Auto Focus, Manual/Auto Focus, Fluke Connect™ |
Establishing a robust industrial preventative maintenance program with fast, accurate focusing. |
|
Ti401 PRO |
640 x 480 |
LaserSharp™ Auto Focus, High Resolution, IR-Fusion™ |
High-resolution diagnostics for inspecting smaller components or targets from a distance. |
Your Step-by-Step Guide to a Flawless Thermal Inspection
Having a great tool is only half the battle. Following a systematic process will ensure your inspections are safe, accurate, and repeatable.
Step 1: The Pre-Flight Checklist (Safety, Load, Environment)
Good preparation is the key to a successful survey.
- Safety First: Always wear the appropriate Personal Protective Equipment (PPE), especially for electrical inspections. Never open a live panel unless you are qualified and authorized to do so.
- Check the Load: A thermal camera sees heat generated by electrical or mechanical load. To see a problem, the equipment must be running under at least 40% of its normal load. Inspecting an unloaded system is like trying to find a leak in an empty pipe.
- Mind the Environment: Direct sunlight can heat surfaces and mask problems. Strong wind can cool a hot spot, making it invisible. Try to conduct inspections under stable conditions and note any environmental factors in your report.
Step 2: Walking the Route (Systematic Approach, Baselines)
A methodical approach ensures you don't miss anything.
- Create an Inspection Route: Don't just wander around. Make a list of your critical assets and group them into logical inspection routes. This makes the process efficient and repeatable.
- Capture Baselines: The first time you scan a healthy piece of equipment, save that image! This is your baseline thermogram. It’s the reference point you will compare all future scans against to detect changes over time.
- Compare and Trend: During inspections, use two main techniques. Comparative analysis means comparing similar components under similar loads (e.g., all three phases of a connection).
- Trending analysis means comparing the current image to its historical baseline to spot gradual temperature increases.
The One Mistake New Thermographers Always Make
The most common error that leads to a wrong diagnosis is misunderstanding emissivity and reflections.
- Emissivity: This is a measure of how well a surface emits heat. Dull, non-metallic surfaces have high emissivity and are easy to measure accurately. However, shiny, unpainted metals (like a copper busbar) have low emissivity and are highly reflective. Pointing a camera at a shiny surface without adjusting the emissivity setting will give you a wildly inaccurate, low-temperature reading.
- Reflections: A shiny surface can act like a mirror, reflecting heat from other sources (including your own body!). A trained thermographer knows how to change their viewing angle to see if a hot spot moves—if it does, it’s just a reflection.
Pro Tip: To accurately measure a shiny surface, apply a small piece of black electrical tape (which has a high emissivity of ~0.97). Let it reach the same temperature as the component, then measure the tape. This simple trick gives you a far more reliable reading.
What to Look For: Common Faults You Can Find Today
With a Fluke thermal imager, you can start finding valuable insights immediately across your entire facility.
Electrical Systems: Spotting Fires Before They Start
Abnormal heat is the number one sign of an impending electrical failure. Regular thermal scans can find :
- Loose Connections: This is the most common fault. A loose or corroded connection creates high resistance, which generates heat. This appears as a very hot, localized spot.
- Overloaded Circuits: An entire circuit breaker or conductor will appear uniformly hot if it’s carrying too much current.
- Phase Imbalance: In a three-phase system, one phase running significantly hotter than the others points to an unbalanced load, which can damage motors.
- Failing Components: A failing breaker or contractor will often run hotter than its neighbours long before it fails completely.
Mechanical Health: Listening to Your Motors and Bearings
For rotating equipment, friction generates heat. Thermal imaging is a safe, non-contact way to monitor the health of :
- Motors: Scan the motor housing, termination box, and cooling fan. Localized hot spots can indicate issues with windings or connections.
- Bearings: An overheating bearing is a classic sign of impending failure, often due to poor lubrication or misalignment. Compare the temperature of a bearing to similar ones operating under the same conditions to spot an anomaly.
- Couplings and Belts: Misalignment in couplings or slipping belts will generate friction and show up as clear hot spots.
Facility & Buildings: Plugging Hidden Energy Leaks
The use cases don't stop at your machines. A thermal imager is a powerful tool for energy audits and facility maintenance. You can easily find:
- Insulation Gaps: Missing or settled insulation in walls and ceilings will show up as clear cold spots in winter (or hot spots in summer).
- Air Leaks: Find costly air leaks around doors, windows, and ductwork.
- Moisture Intrusion: Wet insulation in a roof or wall has a different thermal signature than dry material, often making leaks visible to a thermal camera.
From Image to Action: Creating Reports That Get Results
A thermal image is just data. Its real value comes when you use it to take action.
How to Read a Thermogram (It's Easier Than You Think)
A good report turns your findings into clear, actionable instructions for your maintenance team. Fluke Connect™ software makes this easy, but every good report should include :
- Both the thermal image and a regular digital photo for context.
- The exact location and name of the equipment.
- Load conditions at the time of the scan.
- A clear description of the problem.
- A recommendation for corrective action, prioritized by severity.
Building a Business Case: Proving the ROI to Your Boss
Investing in a Fluke thermal imager delivers a powerful return on investment (ROI) by :
- Slashing Unplanned Downtime: Finding problems early prevents catastrophic failures and keeps production running.
- Boosting Safety: Reducing the risk of electrical fires and arc flash incidents.
- Extending Asset Life: Fixing small issues reduces wear and tear, delaying costly replacements.
- Saving on Energy: Identifying and fixing insulation gaps and steam trap failures can significantly cut utility bills.
A study from Nucleus Research found that an aerospace parts manufacturer that deployed a Fluke Reliability solution achieved a staggering 1,126% ROI and recovered its investment in just 1.2 months, thanks to reduced downtime and increased productivity.
The Revine Tech Partnership: Your Success is Our Mission
As a leading provider of Advanced Test & Measurement Solutions in India, we at Revine Tech do more than just sell equipment. We partner with you to build more reliable, efficient, and globally competitive operations. As an authorized Fluke distributor, we provide not only the full range of thermal imagers but also the expert support to help you succeed. From helping you choose the right camera to providing NABL-accredited calibration services, we are here to support you every step of the way.
Which Fluke Imager is Best for You in 2025?
Choosing the right thermal imager is a critical step in launching or upgrading your preventative maintenance program. The technology is more accessible and affordable than ever, putting the power of predictive maintenance within reach for businesses of all sizes.
Stop reacting to failures and start predicting them. See the invisible problems before they stop your business.
Ready to take the next step? Contact Revine Tech today for a consultation to discuss your specific needs.